How to connect to SQL Server hosted inside a Virtual Machine
Overview
For one of my assignments, we have to use SQL Server Developer Edition as our database, which was hosted inside a Virtual Machine running Windows Server 2019. It took me a while to make the database inside the guest OS accessible to my host machine. Thus, i've written down a guide which hopefully helps you in doing so.
Oracle VM VirtualBox Manager
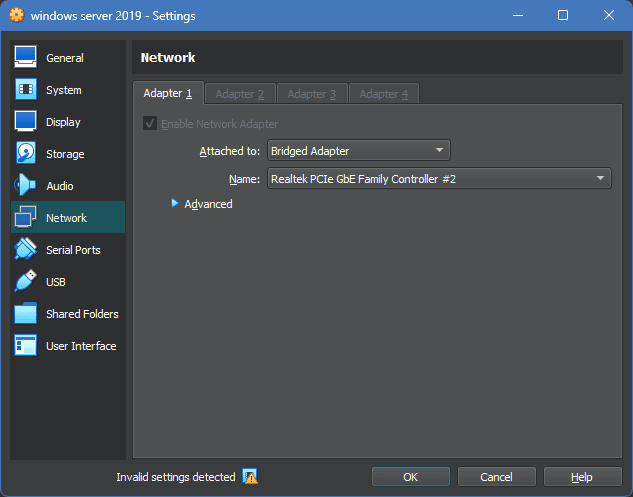
The very first step is to right click on the Windows Server 2019 VM, select “Network” and change the Network Adapter to “Bridged Adapter”. What this does is as follows:
With bridged networking, Oracle VM VirtualBox uses a device driver on your host system that filters data from your physical network adapter. This driver is therefore called a net filter driver. This enables Oracle VM VirtualBox to intercept data from the physical network and inject data into it, effectively creating a new network interface in software. When a guest is using such a new software interface, it looks to the host system as though the guest were physically connected to the interface using a network cable. The host can send data to the guest through that interface and receive data from it. This means that you can set up routing or bridging between the guest and the rest of your network.
From Chapter 6. Virtual Networking
Basically, it creates an extra interface on your computer which makes it so that your VM can be reached inside the network. This is important as you will need to exchange data with the virtual machine using its IP address in the following steps.
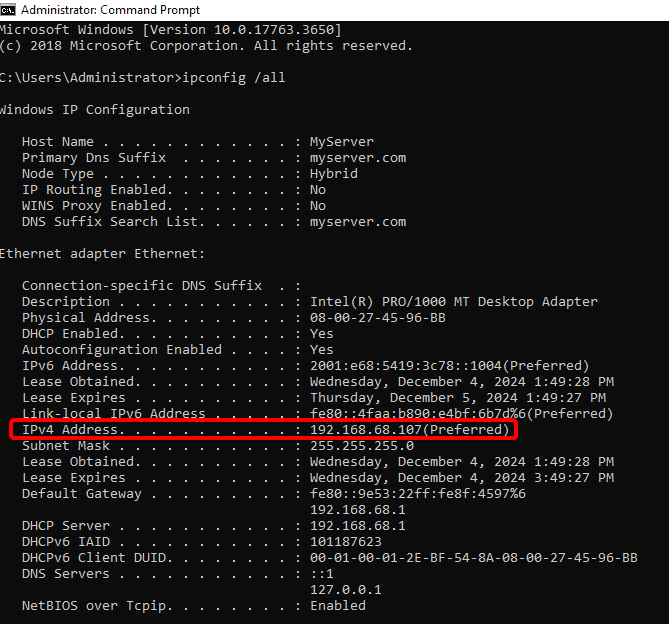
Now start the VM, inside Windows Server 2019 go to Command Prompt and type ipconfig /all. Search for the IPv4 address which belongs to the system, and jot this down somewhere because you'll need it later.
NOTE: Since this isn't a statically set IP address, there's a chance that the IP might change later in the future and mess up the connection. Instead, if you setup DNS services then you can use the domain name as shown in the top portion of the screenshot, you can choose to use either the IPv4 or the domain for connections, more on this later. I recommend using the domain (in my case it's myserver) instead.
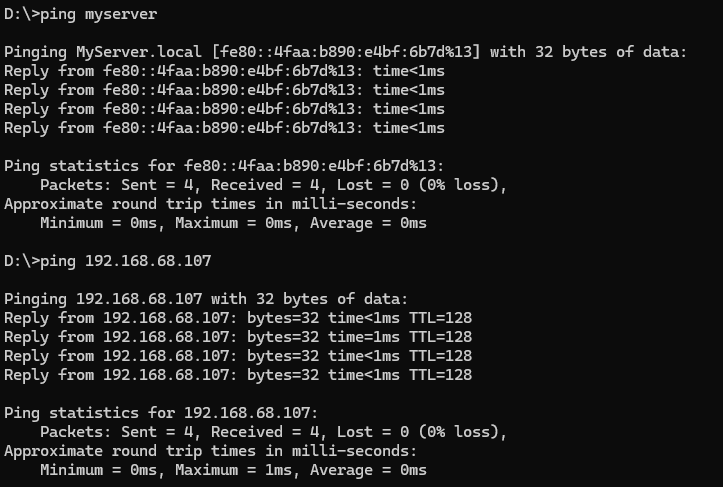
To test whether you can reach the Virtual Machine from your host machine. On your main computer/host machine, go to Command Prompt and try pinging the IPv4 address and the domain (if you set it up). If the pings are successful then you can proceed to the next step.
Windows Server 2019
The following steps will focus more on setting up things inside Windows Server 2019. Before we start, I need to mention that some steps might slightly differ depending on whether you messed up your SQL Server installations before. For me, I had multiple installations of SQL Server Developer Edition which were a pain to debug. However, if you did the setup correctly then it shouldn’t be an issue.
This video will be helpful How to Enable Network Access in SQL Server Configuration Manager | FoxLearn if you want a video guide.
SQL Server Configuration Manager
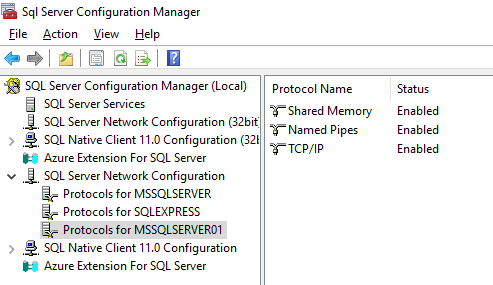
Start up SQL Server Configuration Manager (different than SSMS). As you can see, I have two different installations of SQL Server Developer Edition on my VM (hence the MSSQLSERVER and MSSQLSERVER01), but you should only have one if you set it up correctly. Anyways, if you also have multiple installations like mine, make sure to select the server which you actually use. In my case, the one i've been using is MSSQLSERVER01. Enable 'Named Pipes' and 'TCP/IP', then double click on 'TCP/IP' for more details.
Go to the “IP Addresses” section and scroll down until “IPAll”. Depending on whether you have multiple installations or not, the “TCP Port” here should be displayed differently.
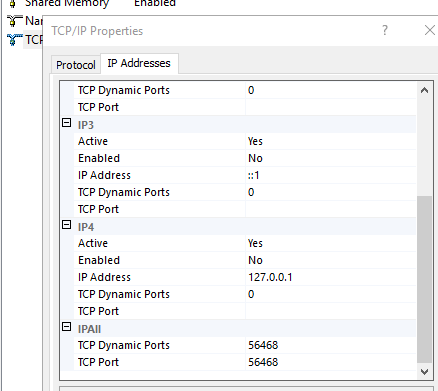
- If you only have one MSSQLSERVER, the TCP Port should be configured to 1433
- If you have multiple installations of MSSQLSERVER, the TCP Port would be assigned to a random unused port. In my case, MSSQLSERVER01, the installation which I use, was assigned to the port 56468.
According to Microsoft's documentation, the default port is 1433. Configure SQL Server to listen on a specific TCP port - SQL Server | Microsoft Learn
If enabled, the default instance of the SQL Server Database Engine listens on TCP port 1433. Named instances of the Database Engine and SQL Server Compact are configured for dynamic ports. This means they select an available port when the SQL Server service is started. When you connect to a named instance through a firewall, configure the Database Engine to listen on a specific port, so that the appropriate port can be opened in the firewall.
If both fields are empty, then just fill it up with a random number of your choice, though make sure you fill it up with a random number within 49152 to 65535 as those are known as dynamic, private or ephemeral ports. Registered port - Wikipedia. If you fill it up with a value within this range, then it would have no chance of conflicting with any other ports.
Jot down whatever value you put in for the TCP Port. You'll need it for later. Next, go to SQL Server Services.
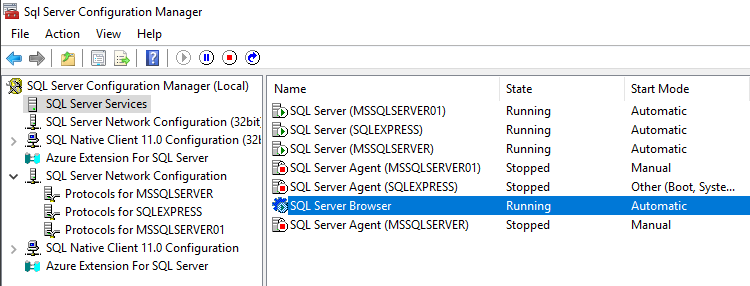
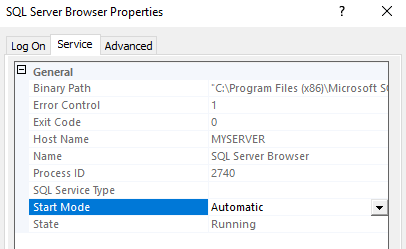
Double click on SQL Server Browser > Service > Start Mode and change it to Automatic. Apply changes.
Now, select the MSSQLSERVER that you use. In my case, it's MSSQLSERVER01 again, and Restart the server.
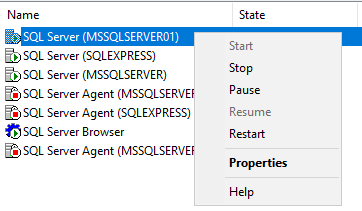
NOTE: This is essentially the same thing as doing net start/stop, but doing it through a GUI is simpler. I know some people couldn’t use this command if they had multiple installations of MSSQLSERVER, in that case you could use MSSQL${SERVER_NAME} to specify which one exactly you wanted to start/stop.

SQL Server Management Studio (SSMS)
Back to SSMS, it's time to test whether you can connect to your server or not after setting up all of the stuff prior. This is how people usually connect to the database.
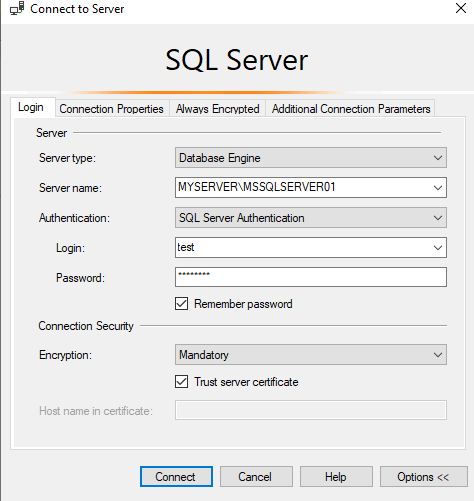
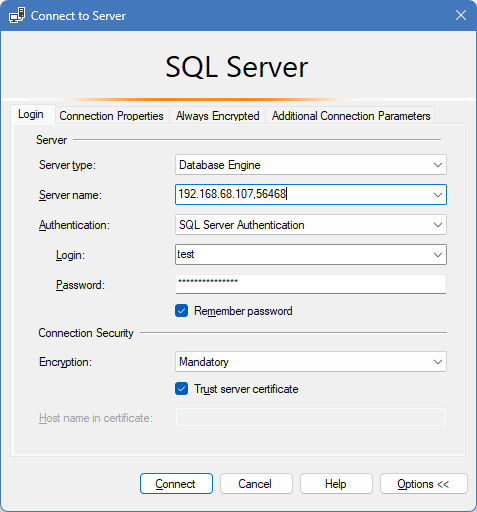
However, now that you've assigned a TCP Port number to the specific server that you want to connect to, you can also try connecting using this format now: {VM_IP_ADDRESS},{TCP_PORT}. In my case, it was 192.168.68.107,56468 but it depends on your given IPv4 address and TCP Port in the earlier steps.
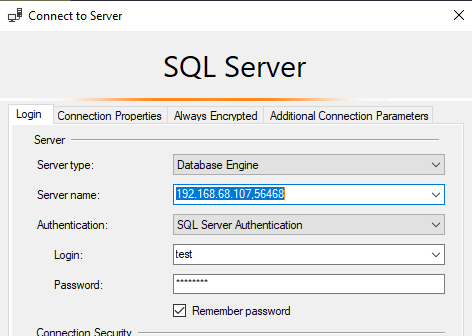
In fact, you can even use the domain name instead of the IPv4 address if you want to, using the format {DOMAIN},{TCP_PORT}. Again, I recommend using the domain method instead as the IPv4 address method won't work if the IP address changes, such as when you restart the virtual machine.
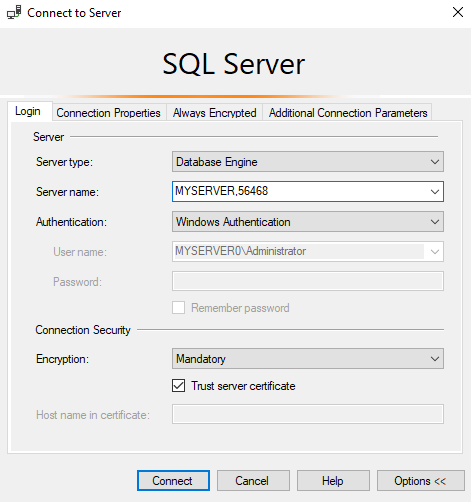
All 3 of these are valid connections to the SQL Server

If you can login to SSMS using your IPv4 Address and/or domain, then you can proceed to the next step.
Configuring Firewall
All of these work within the Virtual Machine, but in order for the SQL server to talk to your host machine outside it, you need to configure Firewall rules first. Search for Windows Defender Firewall, open it and navigate to Advanced Settings.
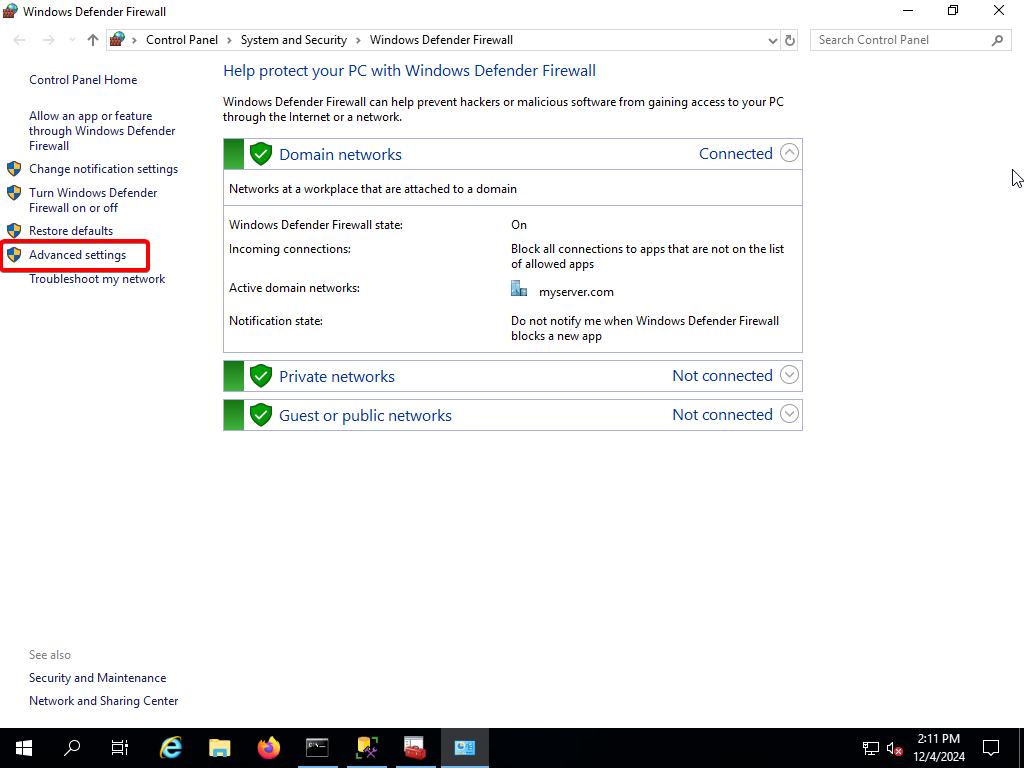
You need to set both Inbound and Outbound rules to make this work. Otherwise, 2-way communication can’t be established. The steps to create both Inbound and Outbound rules are the same. Select New Rule.

- For Rule Type, select Port.
- For Protocol and Ports, select TCP and type in the TCP Port that you specified earlier for the SQL Server. For mine, it's 56468
- For Action, select “Allow the connection”
- For rules, selecting the first 2 options should suffice
- For Name, just put whatever you want
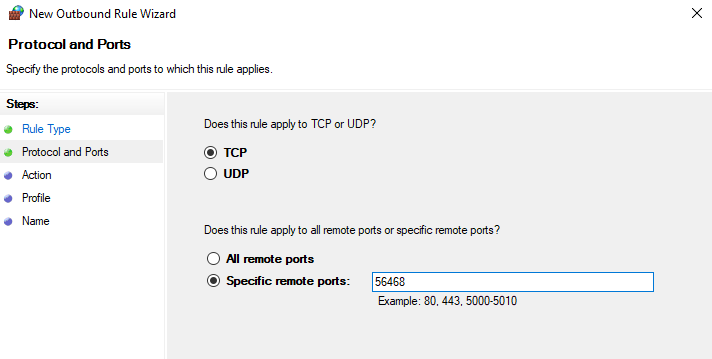
Now that the firewall rules are setup, the SQL Server on virtual machine should be accessible from the host machine.
Host Machine
Free from the clutches of slow virtual machines running windows at last. The following steps have to be done on the host machine
Optional: SSMS (again)
The best way to test whether it's accessible or not is to try and connect to the SQL Server itself using your host machine. Use the same credentials and IP address or domain. If you can access it, then it's a success! Though you can't connect using MYSERVER\MSSQLSERVER01 such as when you were inside the virtual machine, since you must specify the port number to establish an connection.

Connecting to the Database using code
Now that you have a database that you can access, all that's left to do is to access it using a connection string on your programming language of choice.
NodeJS
For NodeJS, you can use the mssql - npm library. Here's the example given, the connection string is highlighted.
const sql = require('mssql')

(async () => {
    try {
        // make sure that any items are correctly URL encoded in the connection string
        await sql.connect('Server=localhost,1433;Database=database;User Id=username;Password=password;Encrypt=true')
        const result = await sql.query`select * from mytable where id = ${value}`
        console.dir(result)
    } catch (err) {
        // ... error checks
    }
})()- For server, insert the IP address OR domain of your VM, in my case it's
192.168.68.107ormyserver. Once again, I recommend using the domain instead as that won't change if your VM reboots - For port, insert your TCP Port that you specified in earlier steps, in my case it's
56468 - For database, you need to specify exactly which database that you plan on using. Since I have both WideWorldImporters and EncryptedDB databases in my server, I specified
EncryptedDB - For user ID and password, use your SQL Server Authentication credentials, such as
testandpassword. Make sure the user has access to the database in the first place, otherwise you'll get errors.
Finally, you might get an error about certificates. To fix that, just follow this StackOverflow post c# - Using Encrypt=yes in a Sql Server connection string -> "provider: SSL Provider, error: 0 - The certificate's CN name does not match the passed value." - Stack Overflow. There are other ways to connect such as using a JSON config, but you can just check the MSSQL documentation for that.
Afterword
That's all you need! I hope this guide helps you in making SQL Server accessible to your host machine.

